This text guides readers through common faucet issues and emphasizes prompt action for effective faucet repair. It recommends assembling a kit with essential tools and compatible replacement parts, then identifying the faucet type. The process involves turning off water valves, removing the handle, disassembling core components, inspecting for damage, and replacing worn-out parts. After careful reassembly, thorough testing ensures functionality and prevents future issues. Regular maintenance, like cleaning aerators and tightening connections, promotes longevity and saves costs.
Need to fix a leaky or stuck faucet? This comprehensive guide walks you through the process step-by-step, from identifying common issues to testing your repaired faucet. Learn how to gather the right tools and materials, differentiate between different faucet types, disassemble the handle, replace worn-out parts, and reassemble everything properly. Discover essential preventive maintenance tips to keep your fixtures in top shape and avoid future headaches. Conquer faucet repair with ease – it’s simpler than you think!
Understanding Common Faucet Issues
Many common faucet issues can be easily resolved with some basic troubleshooting. One of the most frequent problems is a leaky faucet, which can range from a subtle drip to a full-blown gush. This issue often arises due to worn-out O-rings or cartridges inside the faucet handle. Over time, these components degrade and no longer form a watertight seal, leading to leaks. Another typical problem is a loose or stuck faucet handle, which might be caused by mineral buildup or corroded parts.
Proper maintenance can prevent these issues, but when they occur, prompt action is crucial. A simple solution for leaky faucets involves replacing the O-rings or cartridges, a task that usually requires just a few tools and minimal effort. For stuck handles, cleaning or lubricating the affected areas may do the trick, while more severe cases might necessitate partial disassembly of the faucet for thorough inspection and repair.
Gather Tools and Materials for Repair

Before starting any faucet repair, it’s crucial to gather the right tools and materials. For most faucet repairs, you’ll need a few basic tools like adjustable wrenches, pliers, and a screwdriver. These will allow you to loosen and remove any rusted or damaged parts. Additionally, have some replacement parts on hand, such as O-rings, washers, or valves, depending on the specific issue with your faucet. Make sure these are compatible with your faucet model. Keep in mind that store-bought repair kits can be a helpful option for simplifying the process and ensuring you have everything needed.
When shopping for tools and materials for faucet repair, consider your skill level and the complexity of the problem. If replacing a single component like an O-ring seems manageable, you may not need an extensive kit. However, for more intricate repairs or if you’re tackling multiple issues at once, a comprehensive repair kit designed specifically for your faucet type could be a better investment. Always double-check that the tools and parts you purchase are suitable for your particular faucet model to ensure a successful repair.
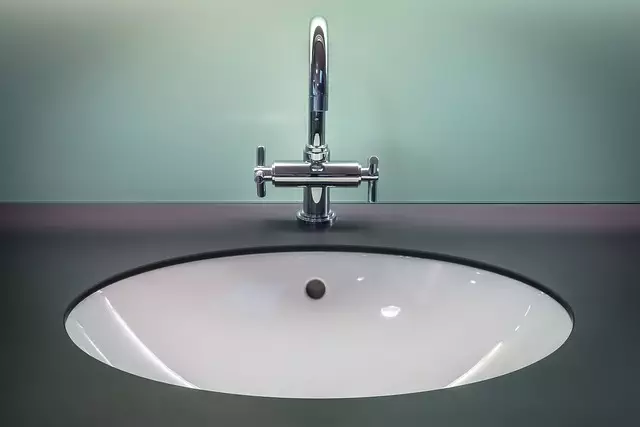
Identifying the Type of Faucet Handle

When tackling a faucet handle repair, the first step is identifying your faucet’s type, which can vary between different styles and mechanisms. Traditional faucets feature a single-handle design where a single lever controls both temperature and water flow. On the other hand, modern faucets often come with more complex multi-handle systems, such as two-handle or single-lever models with separate controls for hot and cold water.
Understanding your faucet’s type is crucial for selecting the right replacement handle and ensuring proper compatibility. For example, single-handle faucets usually require a direct-thread or compression fixture, while multi-handle designs may necessitate cartridge or ceramic disk mechanisms. Visual inspection, examining the existing parts, and checking the manufacturer’s instructions can help you accurately identify your faucet’s type, making the repair process more efficient.
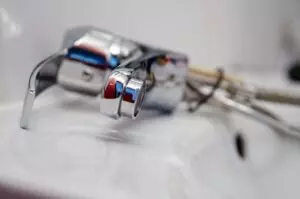
Disassembling the Faucet Handle

When it comes to faucet repair, disassembling the handle is often the first step. This process varies slightly depending on the type of faucet, but the general approach remains consistent. Start by turning off the water supply valves located under the sink to prevent any accidental leaks during the repair. Then, using a screwdriver, carefully remove the handle and any visible parts such as decorative caps or covers. Next, you’ll likely encounter the stem, cartridge, or valve assembly—the core components responsible for controlling water flow and temperature. Disassembling these parts may require further tools like pliers or a small wrench.
Take note of how each part is oriented and connected to ensure proper reassembly later. The disassembly process allows you to inspect these inner workings for any damage, wear, or debris that might be causing the handle issues. By carefully separating each element, you can better identify the root cause of the problem, whether it’s a loose connection, a faulty spring, or a need for replacement parts, making faucet repair more manageable and targeted.
Replacing Worn-Out Parts

When undertaking a faucet repair, one of the most common issues that homeowners encounter is worn-out parts. Over time, components like handles and cartridges can degrade due to constant use, leading to leaks or poor flow. Addressing these issues promptly is crucial for effective faucet repair. Replacing these parts is often a straightforward process, but it requires some basic tools and knowledge.
Many hardware stores carry replacement parts specifically designed for various faucet models, making it easy to find the right components for your specific repair needs. When replacing worn-out parts, ensure that you choose genuine manufacturer parts or high-quality aftermarket alternatives to guarantee longevity and compatibility. This simple step can go a long way in extending the life of your faucet and preventing future leaks or flow issues.
Reassembling the Faucet Properly

After replacing the faucet handle, it’s crucial to reassemble the faucet properly for seamless operation. Begin by ensuring all parts are present and in good condition. Double-check that the handle, stem, washer, and any other components are undamaged and correctly aligned. Proper alignment is key to prevent leaks and ensure a secure fit.
When reassembling, follow the reverse steps of disassembly. Start with attaching the handle securely to the faucet body, ensuring it’s tightly screwed in place. Next, reconnect the stem and washer, making sure they sit properly within the faucet mechanism. Test each connection by gently tightening to avoid over-tightening, which could cause damage. Remember, a well-assembled faucet significantly reduces the risk of leaks, making your repair job successful and long-lasting.
Testing the Repaired Faucet

After successfully replacing the faucet handle, it’s time to test its functionality. Begin by turning on the water supply to ensure no leaks occur at the base of the handle or around the valve stem. If there are no signs of leaks, the next step is to check the water temperature and pressure. Turn the handle to adjust the temperature and observe if the water heats up or cools down as expected. Similarly, test the water flow by opening the faucet wide and checking if the water pressure is consistent and adequate for your needs.
Properly adjusted, the repaired faucet should provide a comfortable and efficient water experience with no unusual noises or vibrations. If any issues persist, double-check all connections and ensure that the handle is securely fastened. Remember, thorough testing guarantees not only a functional faucet but also prevents future problems related to Faucet Repair.
Preventive Maintenance Tips

Regular maintenance can prevent common faucet repair issues and extend the life of your fixture. One simple step is to periodically clean the aerator, which can accumulate mineral deposits over time, affecting water flow. A soft-bristled brush and white vinegar are effective tools for this task. Another preventive measure is checking for leaks regularly, especially around the base of the faucet and the connections. Tightening these areas with pliers or a suitable wrench can often stop minor leaks before they become more significant problems.
Additionally, lubricating the faucet’s moving parts can reduce friction and prevent stiffness. This is particularly important for older faucets. Using a silicone-based lubricant can help maintain smooth operation and reduce the chances of damage. Remember, regular attention to these simple tasks will keep your faucets in top condition, ensuring they function flawlessly and saving you from costly repairs.